Customer Documentation
nFOX User Guide
A customer-facing guide for standing up a private AI model, sending it to production, reviewing evidence, and connecting OpenAI-compatible clients.
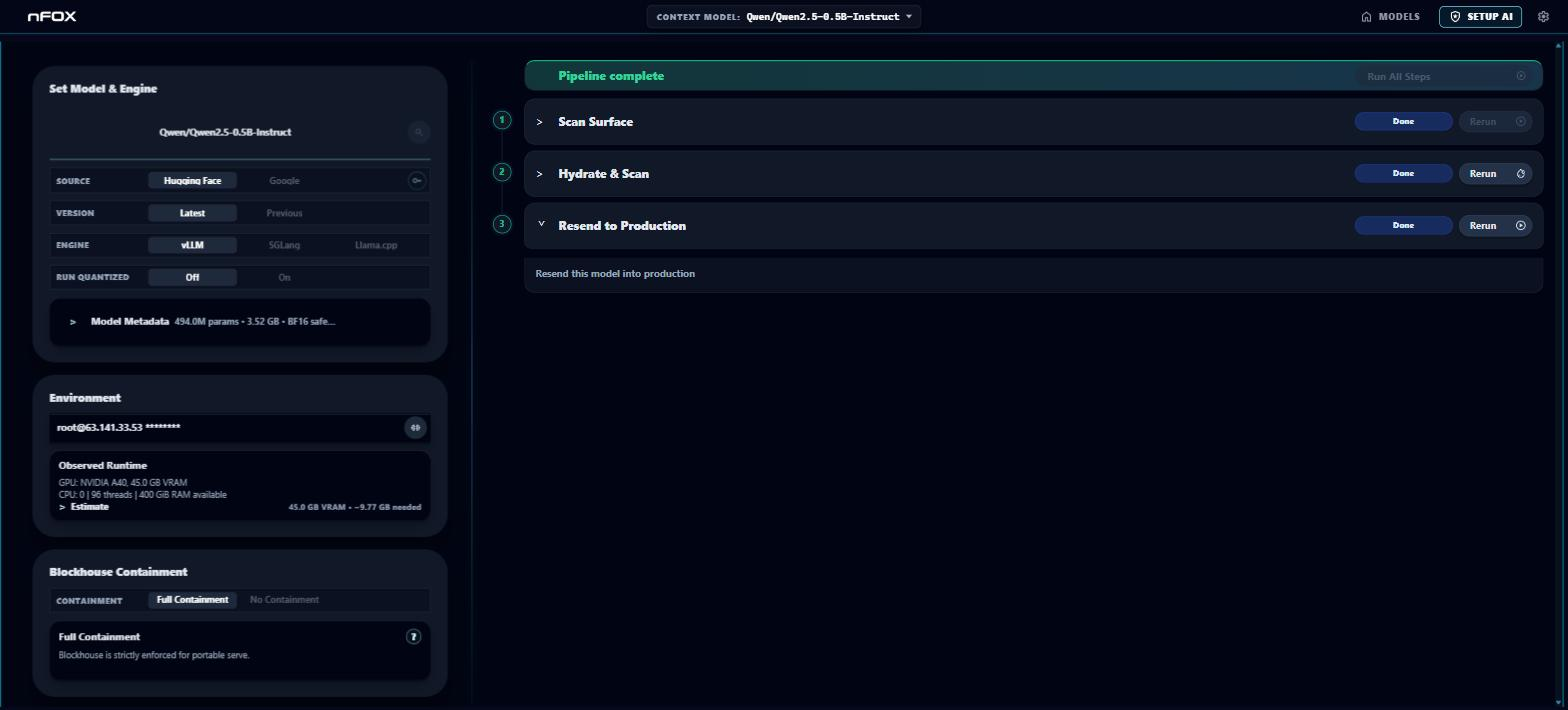
nFOX helps teams run private AI models with evidence. A model is scanned before it runs, validated on your GPU host, contained while it serves, and audited while it is live.
This guide explains the two screens operators use most:
| Screen | Use it for | Main result |
|---|---|---|
| Setup AI | Choose a model, choose an engine, connect a GPU host, scan the model, hydrate weights, send it to production, and run a production audit. | A reviewed model becomes a production instance. |
| Home | Operate production models: connect, chat, inspect serve configuration, review logs and audit evidence, run stress tests, stop, resend, delete, and connect external clients. | A running model is managed and monitored. |
The normal work order is:
- Use Setup AI to prepare and promote a model.
- Use Home to operate that production model.
- Use Logs & Audit, Production Audit, and Stress Test to review evidence over time.
Quick Answers
How do I stand up a model in nFOX?
Open Setup AI, select a model, connect a GPU host, keep Full Containment on, run Scan Surface, run Hydrate & Scan, click Send to Production, run Production Audit, then go to Home and click Connect.
What does Scan Surface do?
Scan Surface reviews the model source before execution. It checks provenance, configuration, tokenizer and template surfaces, code-execution risks, inventory metadata, and other evidence needed before hydration.
What does Hydrate & Scan do?
Hydrate & Scan downloads the reviewed model weights to the connected GPU host and validates the actual files before production.
What does Send to Production do?
Send to Production registers the reviewed runtime, starts the serving engine, warms the model, and makes the production instance available on the Home screen.
What does Production Audit do?
Production Audit tests the live production runtime through containment and prompt-boundary probes. It verifies behavior after the model is actually running.
What is Full Containment?
Full Containment runs the model inside the Blockhouse sandbox, including filesystem, network, syscall, and process boundaries. It is recommended for production use and required for a Zero-Trust Production Audit.
How do I connect my own app or client?
On Home, open the row menu, choose Chat Configuration, then copy the OpenAI-compatible base URL, model alias, and API key into your client.
Start Here: Stand Up a Model
This walkthrough takes a Hugging Face model from selection to a served, audited production model you can chat with.
Before You Start
You need:
| Requirement | Why it matters |
|---|---|
| nFOX app access | You will use Setup AI and Home. |
| SSH-reachable GPU host | The host downloads, validates, contains, and serves the model. |
| Root login plus SSH key | Host preparation and runtime controls require privileged setup. |
| Hugging Face access token, when needed | Required for gated or private Hugging Face repositories. |
Keep these values ready before starting:
Model repository:  example-org/example-model
SSH target:        ssh root@host -p 22 -i ~/.ssh/id_ed25519
HF token:          only needed for gated/private repos
Engine:            vLLM unless you have a specific reason to choose another engine
Containment:       Full Containment for production evidence
Step-by-Step Walkthrough
-
Open Setup AI. Set Context to New.
-
Pick the model. Type a model name in the Model field, press Enter, and select the correct result.
-
Add a Hugging Face token if required. If the repository is gated or private, click the key button next to Source and paste the Hugging Face access token before hydration.
-
Confirm the Model Info Area. Verify the author, model size, storage size, license, weight format, and task match the model you intended to use.
-
Review soft model signals. If nFOX flags the model as multimodal, it will currently be served as text chat only. If it flags Not Chat Model?, confirm the model has a text-generation surface before continuing.
-
Choose the engine. Leave vLLM selected for most GPU deployments. Choose SGLang for throughput-oriented deployments. Choose Llama.cpp for CPU or GGUF workflows.
-
Choose quantization, if needed. Leave Run Quantized off unless you need runtime quantization or a GGUF artifact. For Llama.cpp with a non-GGUF source, turn Run Quantized on so nFOX can create the required GGUF artifact after hydration.
-
Connect the GPU host. In Environment -> SSH, enter the target, for example:
ssh root@host -p 22 -i ~/.ssh/id_ed25519Click connect and wait until the host shows connected/prepared.
-
Set containment. Keep Full Containment selected for production workflows. Production Audit requires Full Containment.
-
Wait for the pipeline to unlock. The right panel checklist should show the model, environment, and containment prerequisites as ready.
-
Run Scan Surface. Wait for Complete, then read the Trust Summary. Green means continue. Amber means review and acknowledge only if you accept the finding. Red means stop, fix the source, or make a deliberate logged override where supported.
-
Run Hydrate & Scan. nFOX downloads the model weights to the host and validates them. Typical runtime is 5-15 minutes for many models. The step must finish Complete before production.
-
Review any Hydrate & Scan failure. If the step fails, open Setup Logs from the card. The logs identify the failing stage and include the output tail needed for diagnosis.
-
Send to Production. Click Send to Production. The runtime is registered and warmed. On a fresh host, warmup can include engine installation and may take several minutes.
-
Wait for production readiness. Status normally moves from
RunningtoWarming UptoProduction ReadyorIn Production. -
Run Production Audit. This is recommended for production evidence and requires Full Containment. Wait for Complete, check
passed/total, and open View Full Report for details. -
Go to Home. The model appears as a row in the Production table.
-
Set the active model. Select the row's Set radio button.
-
Connect to the model. Click Connect and wait for status connected.
-
Chat or connect an external client. Use Show Chat for the built-in chat pane, or open Chat Configuration from the row menu to connect your own OpenAI-compatible client.
If a step fails, use the card's status label, Setup Logs, and View Full Report buttons as the diagnosis path. Each failure is recorded with the stage that failed and its output tail.
Common Tasks
| Task | Where to go | Steps |
|---|---|---|
| Restart a stopped model | Home | Find the stopped row, click Resend, wait for warmup, then click Connect. Copy a new serve token for external clients because resend rotates the token. |
| Change serve parameters | Home -> row menu -> Serve Config | Edit context length, GPU memory, dtype, or engine-specific fields, then click Save & Restart. This restarts serving but does not re-hydrate or re-scan. |
| Stress test a running model | Home -> row menu -> Stress Test | Enable up to 20 questions, add custom prompts if needed, then click Run stress test. |
| Review model activity | Home -> row menu -> Logs & Audit | Review request counts, response counts, evidence paths, recent audit events, and full JSON event payloads. |
| Shut down a runtime | Home -> row menu -> Stop Production | Confirm inline. The row remains and can be resent later. |
| Remove a production registration | Home -> row menu -> Delete Instance | Confirm inline. The registration is removed; evidence and model artifacts remain on disk. |
| Start over on a host | Setup AI -> Environment -> Host maintenance | Use Stop All Processes to cancel active work, or Wipe Host to remove nFOX-managed files after reviewing the preview and typing WIPE. |
Safety Checklist
Use this checklist before production work:
- Confirm the model repository and revision are the intended source.
- Confirm the license and task are acceptable for your use case.
- Confirm the SSH target points to the correct GPU host.
- Keep Full Containment on for production evidence.
- Read every amber advisory before acknowledging it.
- Treat every red blocker or failed step as a stop condition.
- Copy serve tokens only into approved clients.
- Re-copy the serve token after a model is resent to production.
- Before Wipe Host, read the preview and confirm no other active work depends on that host.
Part 1 — Setup AI: Define the Model (left panel)
The left column of Setup AI is where you tell nFOX which model to bring in, how to serve it, where to run it, and how tightly to contain it. Work top to bottom: pick a context, define the model and engine, point at a host, then set containment. The pipeline cards downstream (Scan → Hydrate → Send to Production) read from these settings.
1. Set Context
The context selector at the top of the panel controls which working set the rest of the panel is editing.
- New — start a fresh setup. All fields below are editable and empty/default.
- Selecting an existing production context instead freezes the panel: Model, Source, Version, Engine, SSH target, and Containment are locked to what that production candidate was promoted with, and the cards show a "frozen" style. Switch back to New to edit again.
Use New whenever you are bringing in a model you have not set up before.
2. Set Model & Engine
Defines what you are serving and how it will be served.
Model
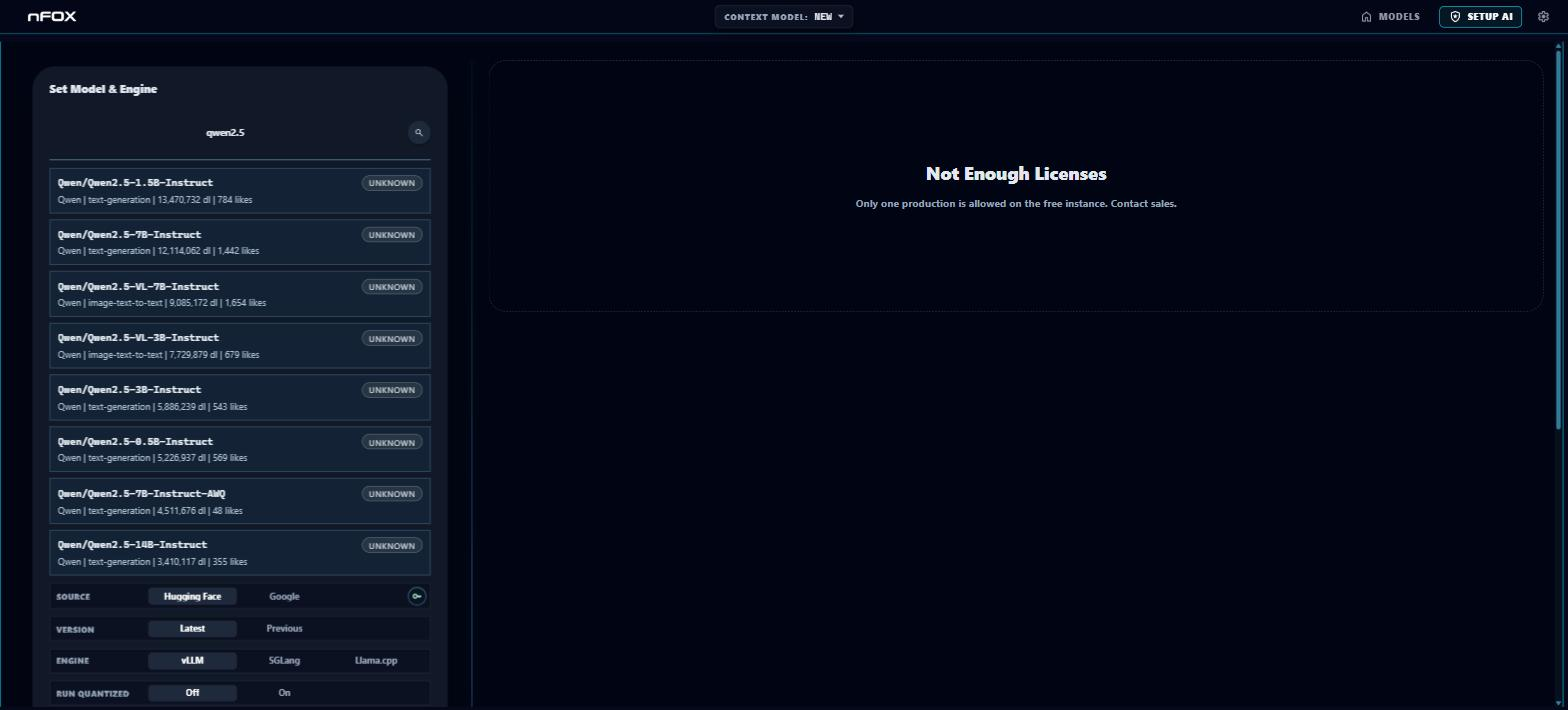
Type a model name into the Model field and press Enter (or the search button) to look it up. For a Hugging Face source this searches Hugging Face and lists candidates; each result shows its repo id, a compatibility tag, and a short description. Click a result to select it. Clearing the field clears the selection.
In this release, model search is available for Source = Hugging Face.
Source
Where the weights come from.
| Option | Status | Notes |
|---|---|---|
| Hugging Face | Active | Search, select, and hydrate directly. |
| Google Model Garden | Not available in this release | Use Hugging Face for model search and hydration. |
Key (Hugging Face only): the key button next to the Source control opens an optional field for a Hugging Face access token. Enter it for gated or private repos; it is stored locally and reused for search and hydrate.
Version
Which revision of the selected repo to pull.
- Latest — the current default revision (default).
- Previous — reveals a Hash field where you enter a tag, branch, or revision to pin an earlier version.
Engine
The serving runtime.
| Option | Use |
|---|---|
| vLLM | Default. Best general-purpose GPU serving. |
| SGLang | Throughput-oriented sibling engine. |
| Llama.cpp | CPU/small-model lane. Requires a GGUF source — if the selected model is not already GGUF, turn on Run Quantized to create one after hydrate (see below). |
Run Quantized (Quant)
Toggle On/Off to serve a quantized build instead of full-precision weights.
- Off — serve the weights as hydrated.
- On — reveals the Quantization card, whose behavior depends on the engine:
- vLLM / SGLang → bitsandbytes (BNB) runtime quantization. No new weight file is created; the engine quantizes at load time. Precision: 8-bit.
- Llama.cpp → GGUF artifact. A derived GGUF file is built after the source is hydrated. Precision: Q4_K_M / Q5_K_M / Q8_0.
Setting Run Quantized only sets the parameters. The actual quantized build happens later in the pipeline (Scan → Hydrate → Send to Production).
Self-Convert for Llama.cpp: if you pick Llama.cpp with a non-GGUF model and Run Quantized is off, a prompt appears offering Turn On Run Quantized to create the required GGUF source.
3. Model Info Area
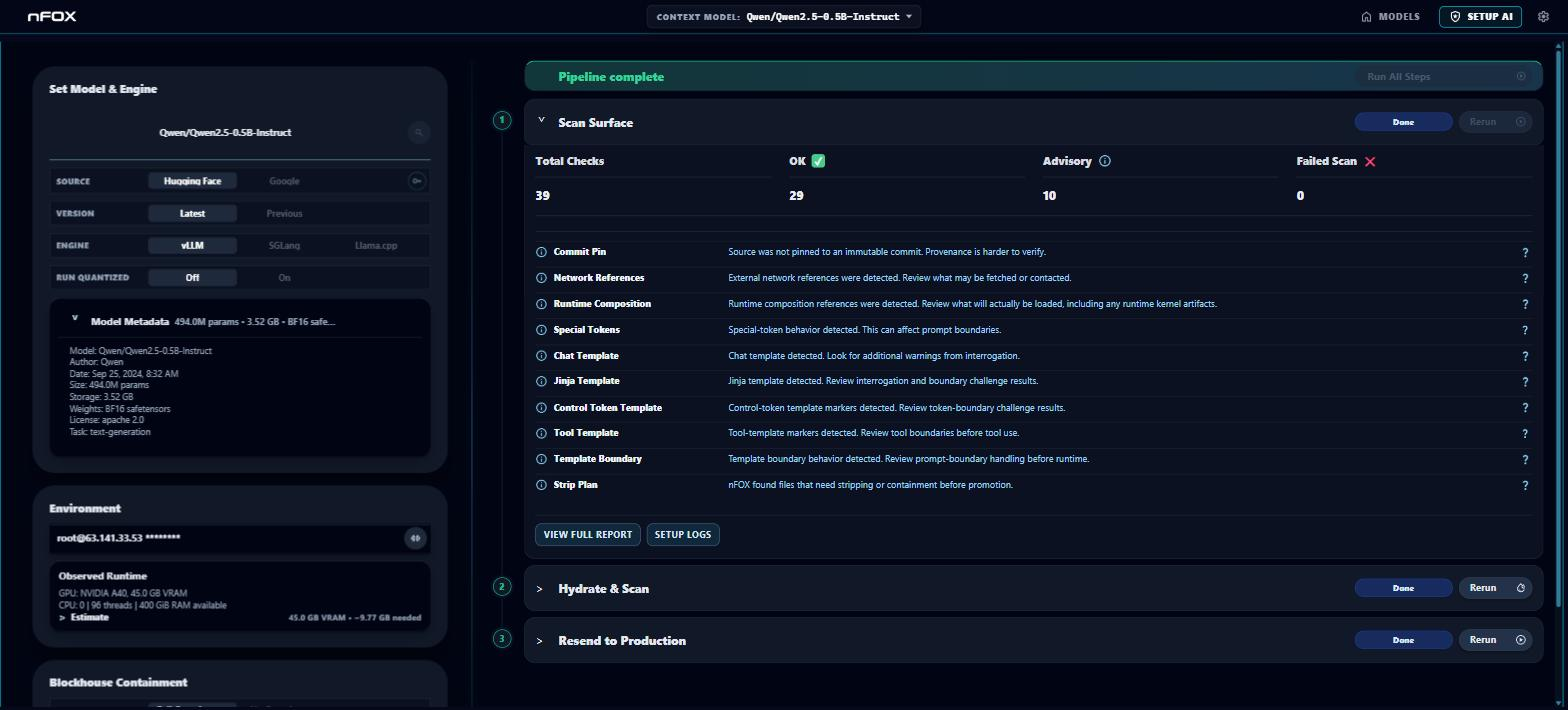
Once a model is selected, this read-only area summarizes what was pulled from the source so you can confirm you have the right artifact before hydrating:
- Model — repo id.
- Author — publishing org/user.
- Date — last-modified date of the repo.
- Size — parameter count.
- Storage — on-disk download size.
- Weights — weight format/precision.
- License — declared license.
- Task — the model's declared pipeline task (e.g. text-generation).
The area also raises soft, pre-hydrate serving signals: a multimodal model is flagged as "served as text chat" (image/audio inputs present but not exposed yet), and a model with no text-out surface is flagged "Not Chat Model?". These are informational, not blockers.
When model metadata provides a maximum context length, nFOX surfaces it here. If the value is not available, confirm the limit from the model card before setting serve parameters.
4. Environment
Points nFOX at the host that will do the work.
SSH
Enter the target in the SSH field, e.g.:
ssh root@host -p 22 -i ~/.ssh/id_ed25519
Then click the connect button to probe and prepare the host. The button turns active once the host is connected/prepared. The target is frozen in a production context.
Choosing a host? See the Host Requirements & Cloud Compatibility Guide for what the machine must provide, which cloud offerings work (short version: a plain GPU VM with Ubuntu 24.04 on any cloud), which don't, and a 60-second self-check to run before you rent.
Info Area
Below the SSH bar, the environment state panel reports connection and host-readiness status.
Host Maintenance
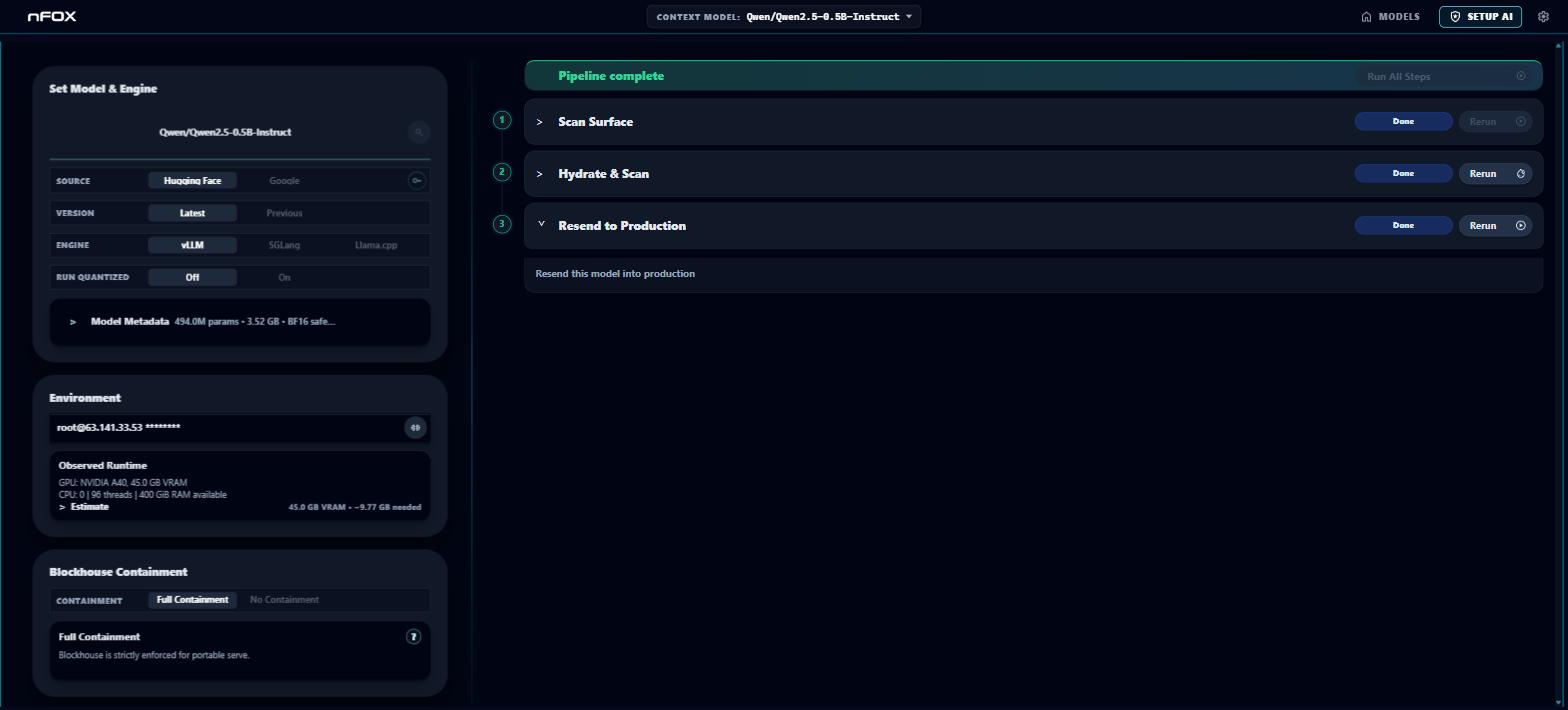
Expand Host maintenance for cleanup actions on the connected host:
- Stop All Processes — cancel any running scan, stress, or production process so you can start over. Does not delete files.
- Wipe Host — remove everything nFOX deposited on this host: the Blockhouse Containment runtime, test stack, model snapshots, Hugging Face cache downloads, stage caches, and any running CUDA processes. This opens a preview listing exact paths, total bytes, and CUDA processes that will be killed, and requires typing
WIPEto confirm. This is destructive and irreversible.
⚠️ Never wipe or reset a host without first checking what live state is on it — inspect the preview before confirming.
5. Blockhouse Sandbox Containment
Sets how tightly the runtime is boxed on the host.
| Option | Meaning |
|---|---|
| Full Containment | Blockhouse sandbox enforced: filesystem restricted, network/syscall controls active, process tree bounded (Landlock + seccomp + namespace isolation). Recommended, and required for a Production Audit. |
| No Containment | "Running With Scissors" mode — disables Blockhouse for this runtime. No filesystem, network, or process claims. Use only for trusted models where you accept the risk. |
Containment level is recorded in the signed evidence for the run and is frozen in a production context. Zero-Trust Production Audit requires Full Containment; surface-risk audits require Blockhouse sandbox containment to be enabled before they will run.
Typical order of operations (left panel)
- Set Context → New.
- Set Model & Engine — search/select the model, pick Source, Version, Engine, and Run Quantized if desired.
- Confirm the Model Info Area matches the model you want.
- Environment — enter SSH target and connect/prepare the host.
- Blockhouse Containment — choose Full (default) or No Containment.
- Move to the pipeline cards: Scan → Hydrate → Send to Production.
Part 2 — Setup AI: The Pipeline (right panel)
The right column of Setup AI is the pipeline: the ordered set of steps that take the model you defined on the left, review it, load it on the host, and put it into production. Each step is a card. You run them top to bottom; a later step only unlocks once the earlier evidence exists.
The pipeline reads its inputs from the left panel (model, engine, host, containment). If those are not set, the pipeline does not appear yet — see Pipeline Not Ready below.
0. Pipeline Not Ready (gate)
Before any step can run, the right panel shows a "Pipeline Not Ready" checklist instead of the cards. Three prerequisites, all set on the left, must be complete:
- Select Model — a model is chosen.
- Connect Environment — the SSH host is connected/prepared.
- Set Containment Level — Full Containment (Blockhouse enabled) or explicit No Containment.
Once all three are green the pipeline cards replace the checklist.
If you see "Not Enough Licenses" instead, you are at your production instance cap. The left side stays browsable, but the pipeline cannot start until a license frees up.
The four pipeline steps
| # | Card | What it does | Typical time |
|---|---|---|---|
| 1 | Scan Surface | Reviews the source without running it — provenance, config, tokenizer, template, and code surfaces. Records evidence and builds promotion policy. | 2–5 min |
| 2 | Hydrate & Scan | Downloads the reviewed artifact onto the GPU host and validates it there — safetensors headers, index, weight evidence, and runtime attestation. | 5–15 min |
| 3 | Send to Production | Registers and starts the reviewed runtime as a production candidate, then warms up the serve engine. | 1–3 min |
| 4 | Production Audit | Exercises the running production runtime through containment and prompt-boundary probes. | 2–6 min |
Each card has a Run/Rerun button on its right, a status label, and expands to show details. The key principle throughout: detection is not execution. Scan Surface flags what a model could do; nothing runs until Hydrate, and behavior is only proven at Production Audit.
Step 1 — Scan Surface
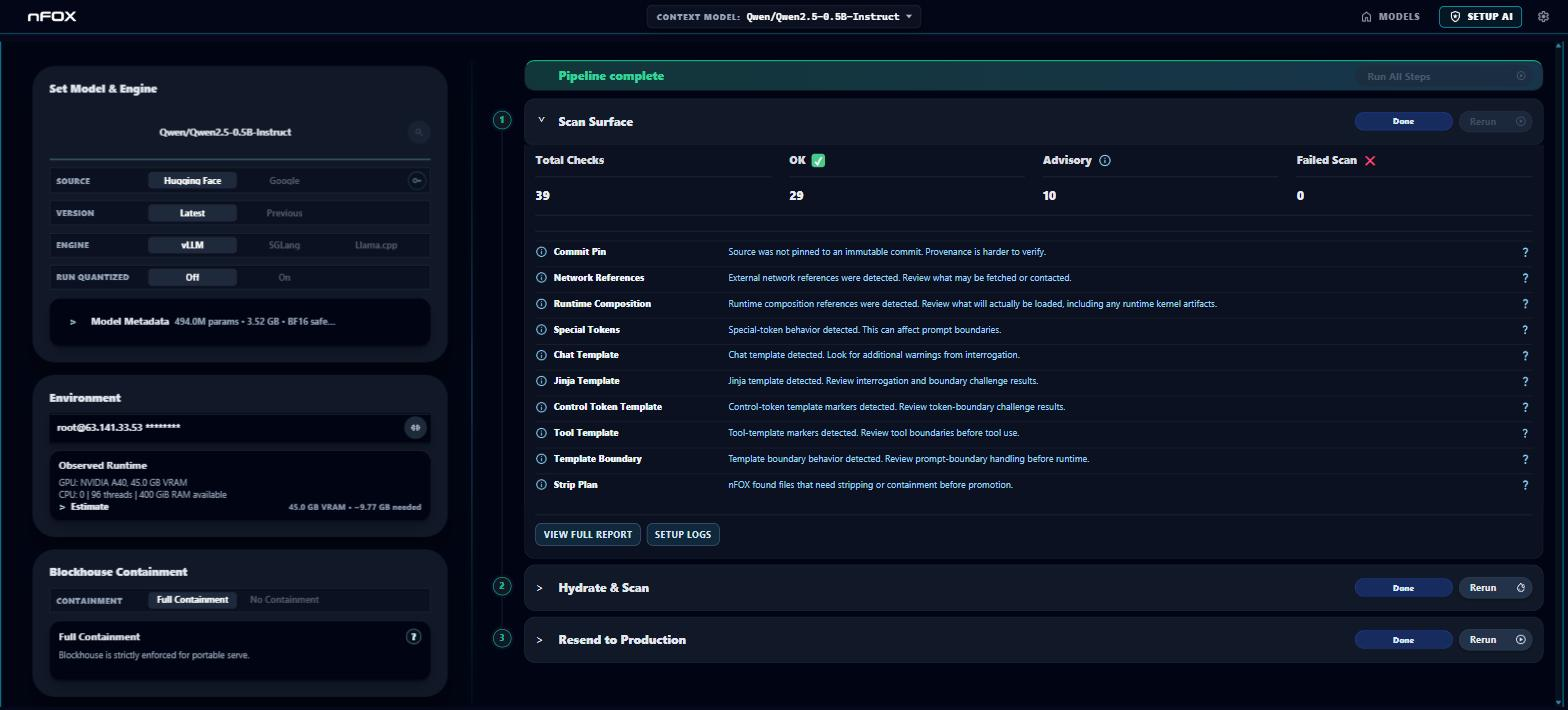
Click Run to scan. The card streams progress across source, config, tokenizer, template, and code surfaces, then shows the Trust Summary with an overall verdict and a per-surface breakdown (see Alerts below).
- Rerun re-scans (e.g. after a new revision).
- Scan Surface authenticates the source and produces the promotion policy that later steps enforce. A surface-risk finding here may require containment downstream but does not itself run code.
Status labels: Ready → Running → Complete.
Step 2 — Hydrate & Scan
Downloads the artifact to the connected host and validates the loaded weights. This is the first step that touches the real bytes on the GPU box.
- Requires a connected environment. If no host is set, the card shows "Add SSH."
- Produces the runtime attestation (file + weight evidence) that Send to Production requires.
- Surface-risk review permits a hydrated scan and SHA attestation; a full Production Audit additionally requires Blockhouse Containment.
Status labels: Ready / Add SSH → Running → Complete (or Failed).
Step 3 — Send to Production
Registers the reviewed runtime as a production candidate and starts warmup. The button reads Send to Production the first time and Resend to Production once an instance exists.
It will not start (the button is disabled with a reason) until:
- a model is selected;
- for llama.cpp, a GGUF source exists (turn on Run Quantized to create one);
- Hydrate & Scan has run and passed;
- warmup from any prior prepare has finished;
- the serve runtime is prepared.
Status labels: Ready → Running (Registering) → Warming Up → Production Ready / In Production.
During warmup, keep the card open and watch the status label. A fresh host can spend several minutes installing or preparing the selected engine before the model reaches production readiness.
Step 4 — Production Audit
Runs adversarial prompt-boundary and containment probes against the live production runtime — this is where behavior is actually observed.
- Pending until Send to Production is registered and warmup is complete.
- Disabled for llama.cpp/GGUF runtimes (the current audit runner expects a Transformers/safetensors runtime), and requires Full Containment for a Zero-Trust audit.
- On completion it reports
passed/totalprobes, any issues, and any scan failures, with View Full Report and Setup Logs buttons.
Status labels: Pending / Disabled → Ready → Running → Complete (or Failed).
Alerts — how to read them
Alerts are how the pipeline tells you what it found and whether you can proceed. They appear in three places: the status color on each card, the Trust Summary pill and rows under Scan Surface, and the Production Audit results. They all use the same severity vocabulary.
1. Card status colors
Every pipeline card is tinted by its state:
| Color / class | Meaning |
|---|---|
Neutral — ready, pending |
Not run yet, or waiting on a prerequisite. |
Blue — running |
Step is executing. |
Green — clean, complete |
Ran and passed; evidence recorded. |
Amber — review, risky, warning |
Findings need your attention; proceeding may require acknowledgement or containment. |
Red — blocked, failed |
A hard stop, or the step errored. Cannot proceed as-is. |
2. Trust Summary pill (Scan Surface)
After a scan, the summary shows a one-word verdict pill plus a count:
- OK — no findings needing attention.
- N Advisories ("1 Advisory", "3 Advisories") — that many surfaces flagged for review. Advisories are informational-to-cautionary; they don't necessarily block, but you should read them.
- Scan In Progress — still running.
The overall outcome behind the pill is one of: clean → risky → review → blocked. review means at least one surface needs operator attention; blocked means a hard stop that policy will not let past active trust.
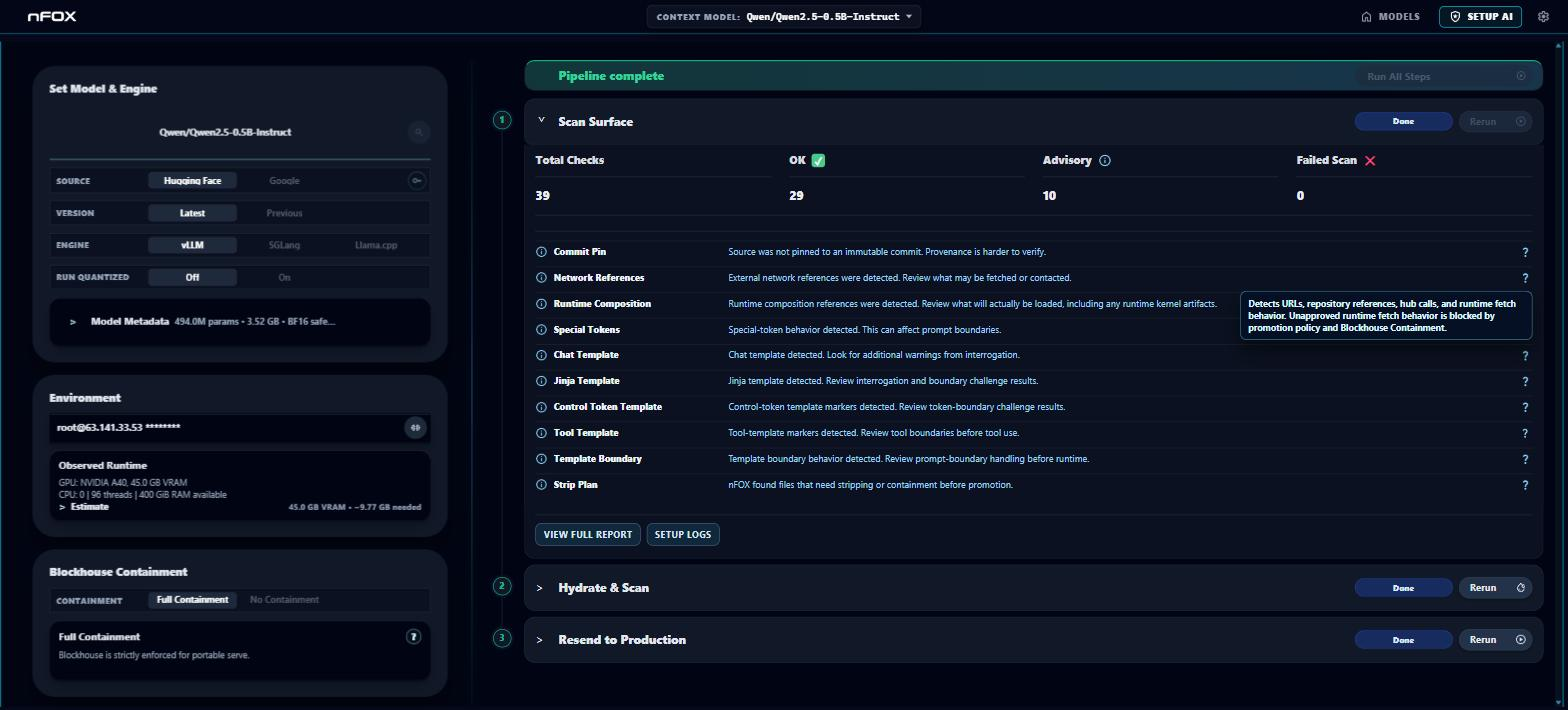
3. Surface groups and severity tiers
Findings are routed into six groups so you can see where the risk is:
Provenance · Weights · Tokenizer / Templates · Code Execution · Config / Inventory · Scan Metadata
Each finding carries a severity tier, derived from its evidence state:
| Tier | From states like | What it means |
|---|---|---|
| blocker | failed, mismatch | Hard stop. Must be resolved or explicitly overridden before proceeding. |
| review | warning, detected, required, missing | Needs an operator decision — acknowledge, contain, or fix. |
| evidence | passed, recorded, not_run, not_seen | Informational; recorded for traceability, no action needed. |
Individual verdicts within a group carry a matching severity: hard_stop (blocks), warn_ack (proceed only after you acknowledge), and soft_flag (noted, no gate).
4. Verdict kinds (what the alert does)
Beyond severity, an alert has a kind that says how it is enforced:
- enforced — policy blocks or requires containment; you cannot silently skip it.
- deferred — the surface can't be judged now and is re-checked later (e.g. large weights deferred from Surface review to Hydrate).
- advisory — recorded for your awareness; does not change trust mode (e.g. license findings).
- boundary_close — a boundary condition (such as a template-boundary vulnerability) that containment neutralizes when Blockhouse is enabled.
5. What to do about an alert
- Green / evidence / OK — nothing to do; continue to the next step.
- Amber / review / advisory — read the finding. If it's a
warn_ack, you'll get an acknowledge / proceed control; proceeding is allowed and recorded. Some findings say "proceed only under Blockhouse Containment" — make sure containment is Full before continuing. - Red / blocker / failed — do not proceed as-is. Either fix the source, or (for surfaces that support it) use the explicit operator override, which records a signed proceed acknowledgement against that specific scan report. Overrides are deliberate and logged, never silent.
Hydrate & Scan and Production Audit surface their own alerts the same way: a
Failedstatus is a red stop with details, and the audit'spassed/total,issues, andscan failcounts drive the amber/red coloring. Behavior evidence is only trustworthy if containment was active and healthy during the run — that is itself one of the audited checks.
Pipeline at a glance
Left panel ready (Model · Environment · Containment)
        │
        ▼
1. Scan Surface   → Trust Summary + advisories        (nothing runs)
        │
        ▼
2. Hydrate & Scan → weights validated on host, attestation
        │
        ▼
3. Send to Production → registered → warming up → ready
        │
        ▼
4. Production Audit → live containment + prompt probes → pass/fail
Read the alert on each card before advancing. Green means the evidence is clean; amber means decide; red means stop or override deliberately.
Part 3 — Home: Operate Production Models
The Home screen is your control room for models that have been through Setup AI and registered for production. Its main element is the Production table: one row per production instance, with live status and per-instance controls. From here you connect to a running model, chat with it, inspect its configuration and audit evidence, run stress tests, connect your own client, and stop or delete it.
New here? A model only appears on this screen after you take it through Setup AI (Scan → Hydrate → Send to Production) — see Parts 1–2. To add one now, use + Add New (top right), which drops you into Setup AI.
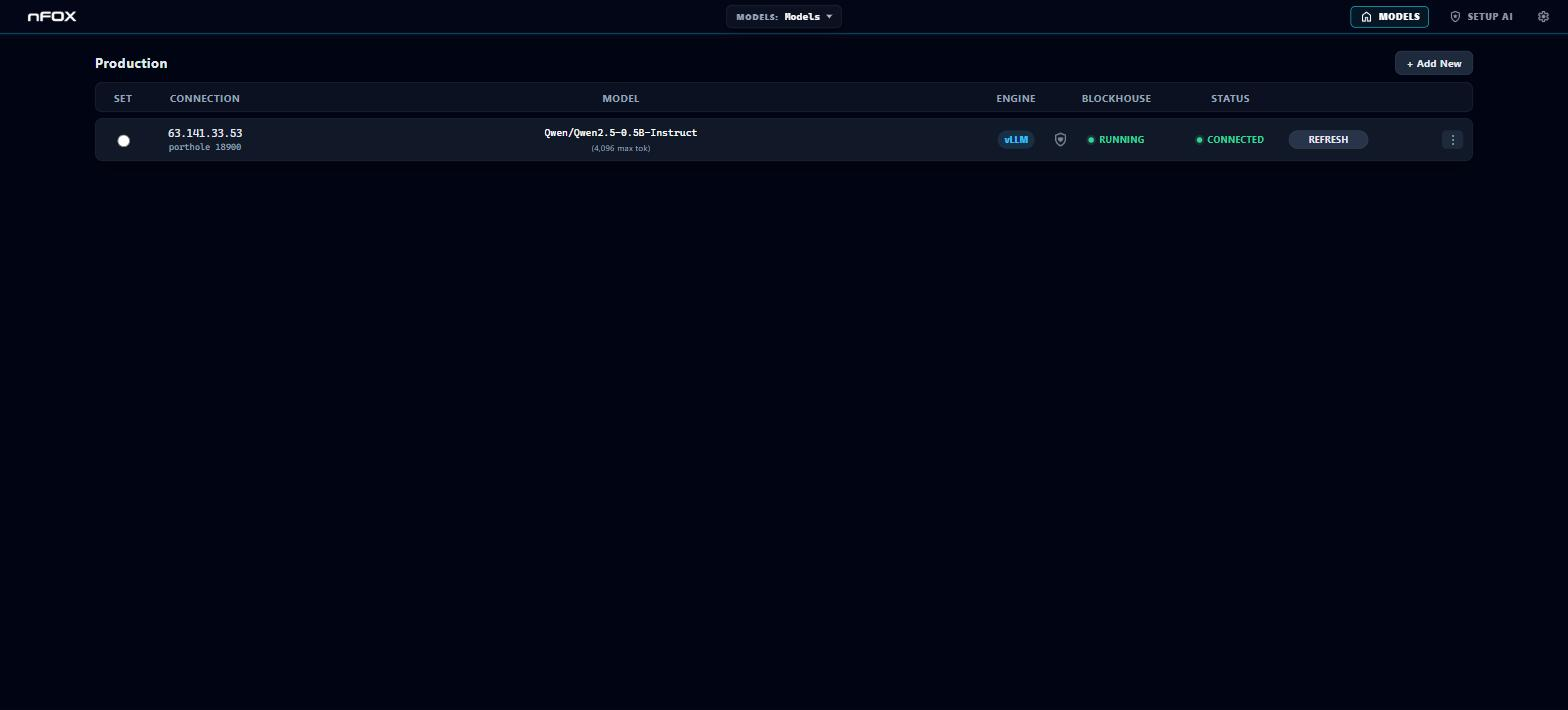
The Production table
Each registered instance is a row with these columns:
| Column | What it shows |
|---|---|
| Set | A radio button that makes this instance the active production context. The selected row is the one the Chat pane talks to, and the one whose settings Setup AI shows when frozen. |
| Connection | The host the model runs on (IP or SSH host, or local) and, below it, the porthole public port when one is assigned. Hover for host / porthole / internal vLLM port / slot detail. |
| Model | The model id. A small runtime tag may appear — GGUF (a GGUF artifact running through llama.cpp) or Self GGUF (a GGUF that nFOX produced itself during quantization). |
| Engine | The serving engine chip: vLLM, SGLang, Llama.cpp, or Unknown (engine not recorded). Hover for the source of the detection. |
| Blockhouse | Containment status, with a heartbeat cue dot to its left (see Heartbeat). |
| Status | Overall live status of the instance (see Status values). |
| Actions | The primary action button, the Chat toggle (selected row only), and the ⋮ menu. |
If there are no rows yet, the table shows "No production instances yet" — go through Setup AI first.
The primary action button
The left-most action button changes with the instance's state:
- Connect — the client isn't connected; click to open the client connection to the running model.
- Refresh — already connected; re-establishes/refreshes the client connection.
- Resend — the runtime is stopped; click to resend it to production (re-registers and warms it back up).
- Connecting… / Refreshing… / Resending… / Running… — an operation is in flight; the button is disabled until it settles.
The button is disabled while a global operation is busy, while a run is active, or when the row has no candidate id yet.
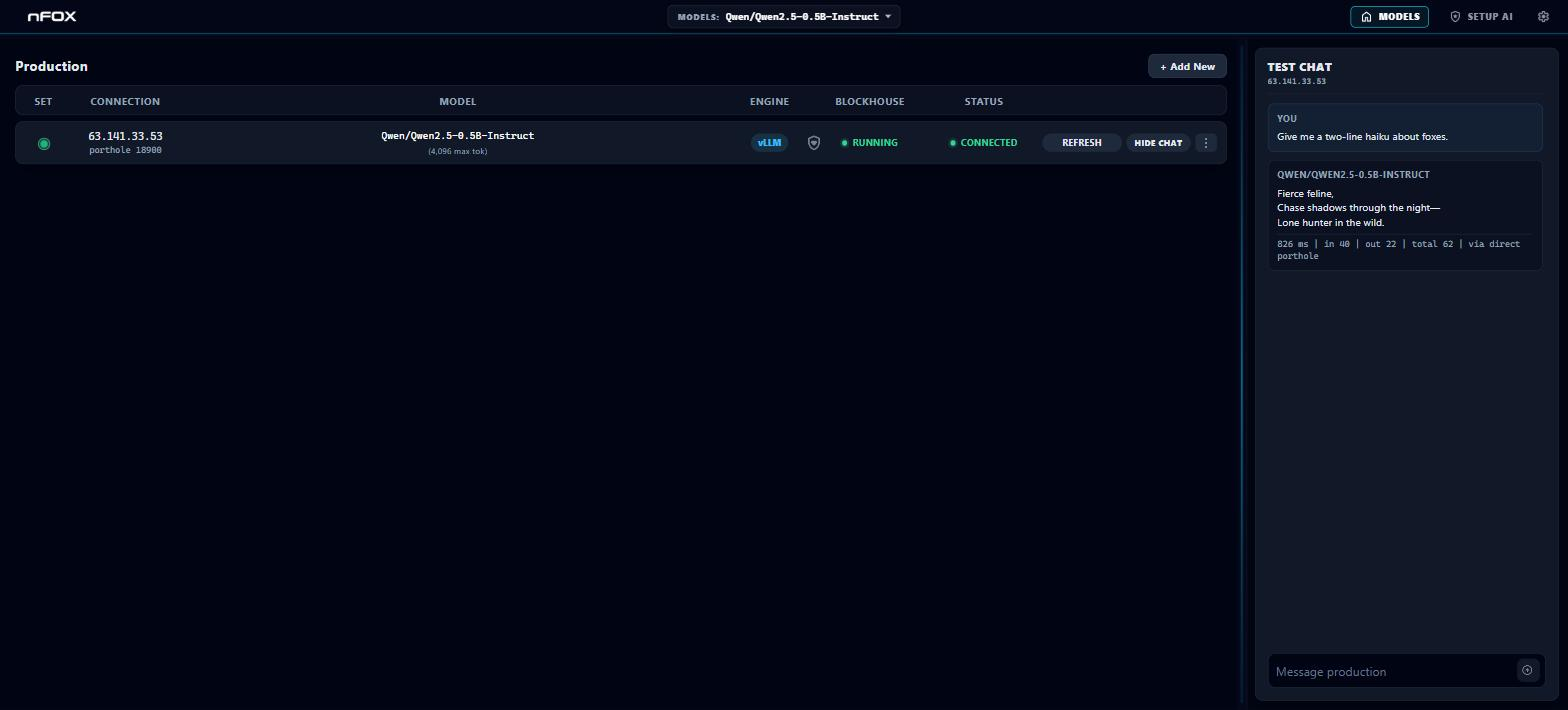
Chat (built-in)
For the selected row (the one with the Set radio on), a Show Chat / Hide Chat button appears next to the primary action. This opens or hides the Chat pane docked alongside Home, which talks to that instance. Only the active production context can be chatted with — switch the Set radio to talk to a different instance.
The built-in Chat pane needs no client setup — it uses the registered connection automatically (including the SSH path to a remote porthole). To connect an external tool instead, see Connecting your own client.
The ⋮ menu (per-instance actions)
Clicking ⋮ opens the actions menu for that row. Most items are disabled until the row has a registered candidate id.
| Item | What it does |
|---|---|
| Chat Configuration | Opens the Inspector with the connection details a chat client needs to reach this instance. |
| Serve Config | Opens the Inspector with the editable serve-engine parameters, with a Save & Restart. |
| Logs & Audit | Opens the Inspector on the audit + logs view — request/response counts, evidence paths, and recent audit events. |
| Stress Test | Opens the Inspector's stress-test panel to probe the running model with adversarial prompts. |
| Cancel Run | (only while a run is active) Requests cancellation of the in-flight registration/warmup run, then refreshes the row. |
| Stop Production | Stops the running runtime. Opens an inline confirm. Enabled only when the row has a candidate id, no run is active, and it is in a stoppable state. |
| Delete Instance | Removes the instance from Production (stopping it first if running). Opens an inline confirm. Evidence and model artifacts stay on disk — only the production registration is removed. |
Stop and Delete both open an inline confirmation before acting.
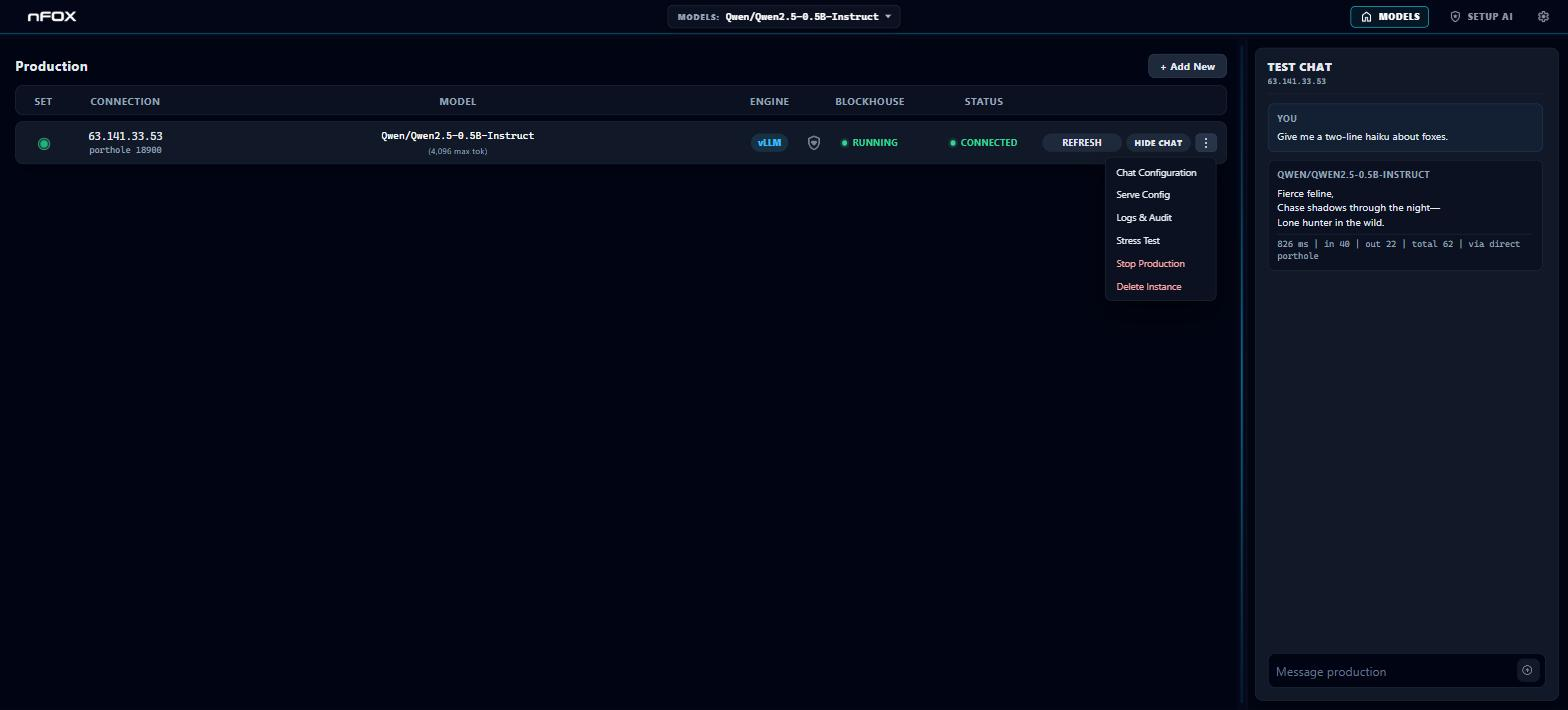
The Inspector dock
The first four menu items (Chat Configuration, Serve Config, Logs & Audit, Stress Test) open a shared Inspector dock below the table rather than a modal. The dock header shows which tool is active and for which model/host/engine. Only one Inspector view is open at a time; opening another switches the dock, and closing it (Cancel) returns you to the plain table. Each view loads its data for the row's candidate when opened.
Inspector: Chat Configuration
Shows everything an OpenAI-compatible client needs to talk to this instance. A Status pill at the top reads ready (green), loading (amber), or pending/blocked (red).
Primary lines (each with Copy):
- API Host — the base host, e.g.
http://<host>:<porthole>(the base URL with a trailing/v1stripped). - API Path —
/chat/completions. - Model — the model alias to send in the request body.
- API Key — masked in the display; Copy copies the real key. This is the instance's serve token, sent as a Bearer credential.
If the config can't be used yet, the panel lists Blocked: reasons and softer Note: warnings:
| Blocker | Meaning / fix |
|---|---|
| production is not ready | The serve runtime isn't up. Connect / (Re)send to production first and wait for running/connected. |
| missing base URL | No serve endpoint recorded yet — production has not assigned a porthole. |
| missing model alias | The registration has no model alias; resend to production. |
| missing active API key | The serve token could not be read from the porthole secret (local or remote). Refresh after the runtime is fully up. |
| SSH tunnel is not currently reachable (warning) | The config requires a tunnel and the health check through it failed — open the tunnel (below) and Refresh. |
Advanced (collapsible) exposes: Client label, full OpenAI Base URL (ends in /v1), Key Source (where the token was read from), and the Health / Models / Chat URLs, plus Local Access status and the SSH Tunnel command when a tunnel is required.
Footer: Cancel closes; Copy All copies the whole config as text (enabled once base URL and model are present).
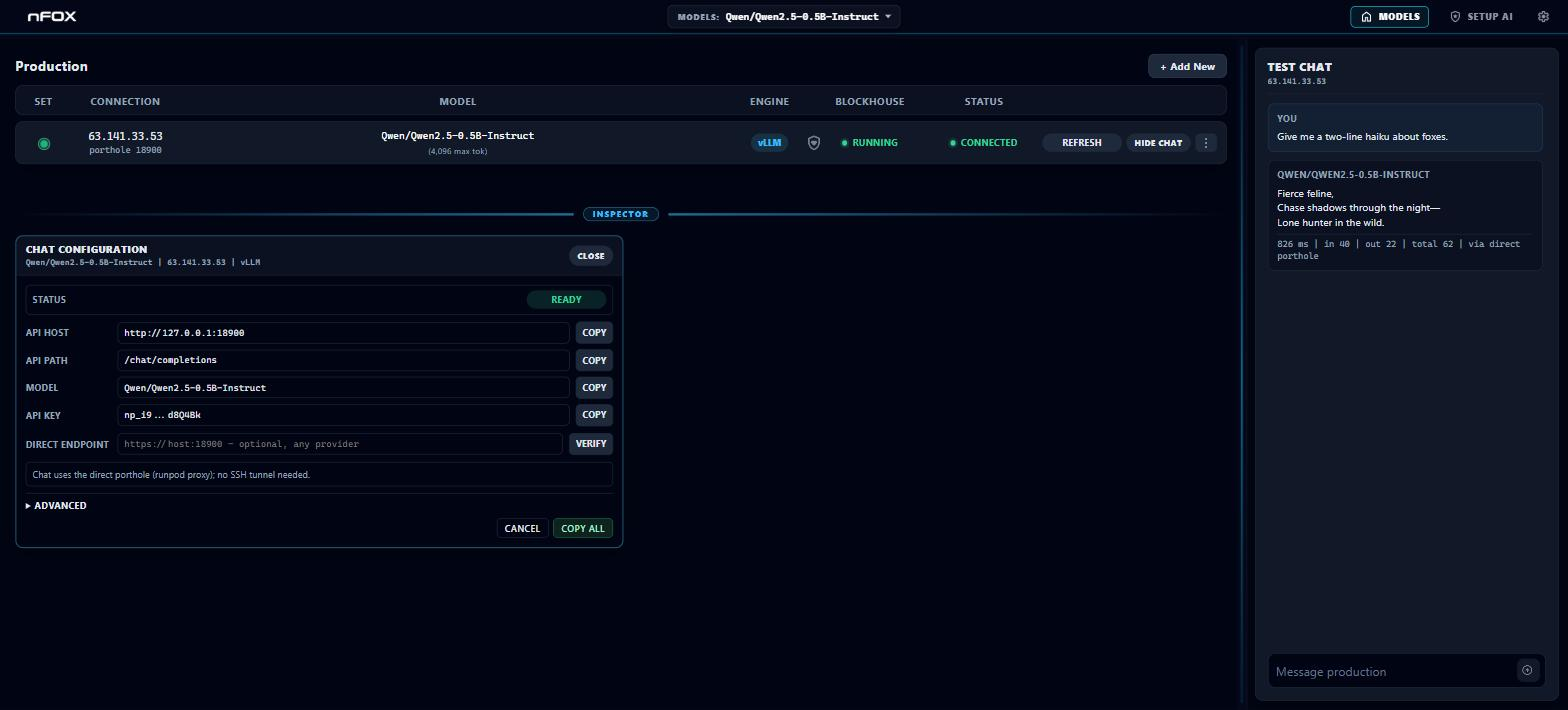
Connecting your own client
Any OpenAI-compatible tool — the openai SDK, curl, LibreChat/Open WebUI-style front-ends with a "Custom OpenAI" provider, agents frameworks — can talk to a production instance directly. The porthole speaks the OpenAI chat-completions API and authenticates with a Bearer token.
Step 1 — Get the values. ⋮ → Chat Configuration, wait for the ready pill, then copy:
- OpenAI Base URL (Advanced) — e.g.
http://<host>:<port>/v1 - Model — the alias to put in the request body
- API Key — the serve token
Step 2 — Check whether you need the SSH tunnel. Look at the base URL's host:
-
A real host/IP — your client can reach the porthole directly; skip to step 3.
-
127.0.0.1/localhostwith a remote instance — the porthole is only exposed on the GPU host's loopback, so your machine needs an SSH tunnel. Copy the SSH Tunnel command from Advanced — it has the form:ssh -N -L <port>:127.0.0.1:<port> root@<host> -p <ssh-port> -i <key>Run it in a terminal and leave it open for as long as the client is in use. Your client then talks to
http://127.0.0.1:<port>/v1and SSH forwards to the remote porthole. The panel's Local Access line tells you whether the tunnel currently works (reachable / unreachable with detail); if a client can't connect, check this first.
Step 3 — Point the client at it.
curl smoke test (the same three values everywhere):
curl http://<host>:<port>/v1/chat/completions \
  -H "Authorization: Bearer <API_KEY>" \
  -H "Content-Type: application/json" \
  -d '{
    "model": "<MODEL_ALIAS>",
    "messages": [{"role": "user", "content": "Say hello."}]
  }'
Python (openai SDK):
from openai import OpenAI

client = OpenAI(
    base_url="http://<host>:<port>/v1",   # OpenAI Base URL from the panel
    api_key="<API_KEY>",                  # serve token from the panel
)
reply = client.chat.completions.create(
    model="<MODEL_ALIAS>",
    messages=[{"role": "user", "content": "Say hello."}],
)
print(reply.choices[0].message.content)
GUI clients (Custom OpenAI / OpenAI-compatible provider): set Base URL to the OpenAI Base URL, API key to the serve token, and pick/enter the model alias. Nothing else is required.
Step 4 — Verify. Two quick probes (both URLs are in Advanced):
- Health —
GET <health URL>returns OK when the engine is up. - Models —
GET <base>/v1/models(with the Bearer header) lists the served alias.
Good to know:
- Every request and response through the porthole is recorded in the audit trail (see Logs & Audit) — external clients are audited exactly like the built-in Chat pane.
- The serve token rotates when the instance is re-sent to production; if a long-lived client starts getting 401s after a restart, re-copy the key.
- Keep the tunnel command running in the foreground (
-Nopens no shell); closing the terminal drops the tunnel and clients will see connection-refused. - Multimodal models are served as text chat only. Image/audio inputs are not exposed in the current release — requests with image content parts (e.g. OpenAI
image_urlmessages) are rejected, and the model's vision/audio surfaces are recorded as latent in its evidence rather than served. Send text messages only.
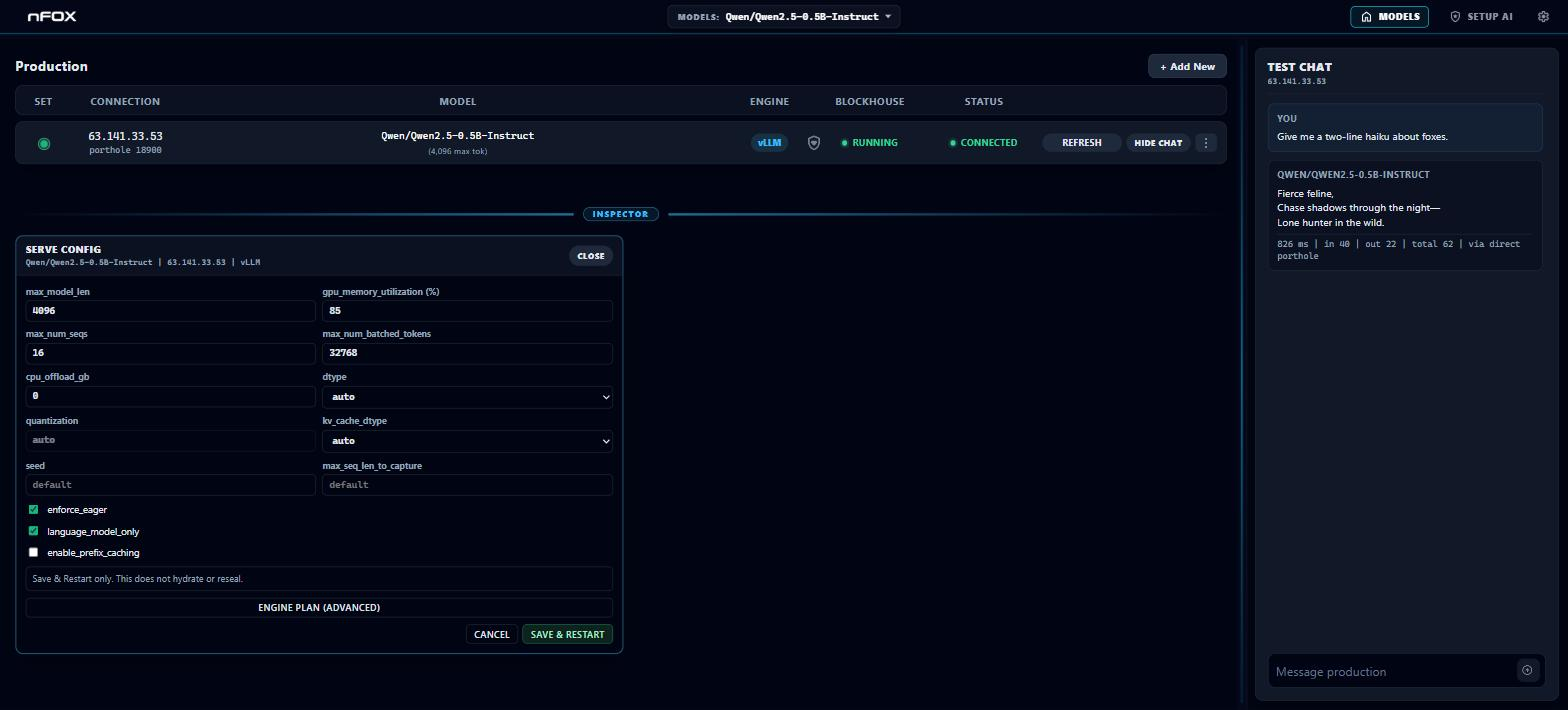
Inspector: Serve Config
Title reads Serve Config -
- vLLM —
max_model_len,gpu_memory_utilization (%),max_num_seqs,max_num_batched_tokens,cpu_offload_gb,dtype(auto/float16/bfloat16/float32),quantization(read-only),enforce_eager,language_model_only. (Advanced KV/cache controls are noted as reserved for later.) - SGLang —
context_length,mem_fraction_static,max_running_requests,chunked_prefill_size,max_prefill_tokens,kv_cache_dtype,cuda_graph_max_bs,schedule_policy,schedule_conservativeness,disable_cuda_graph. - Llama.cpp —
cache_type_k/cache_type_v, plusofflineandno_webui(both fixed on). A note states GGUF selection is fixed by the sealed serve artifact.
max_model_len / context_length are capped at the model's context limit where known. Footer: Cancel, or Save & Restart — the only apply path. As the panel states: "Save & Restart only. This does not hydrate or reseal." Editing here changes runtime serve parameters and bounces the engine; it does not re-run the pipeline.
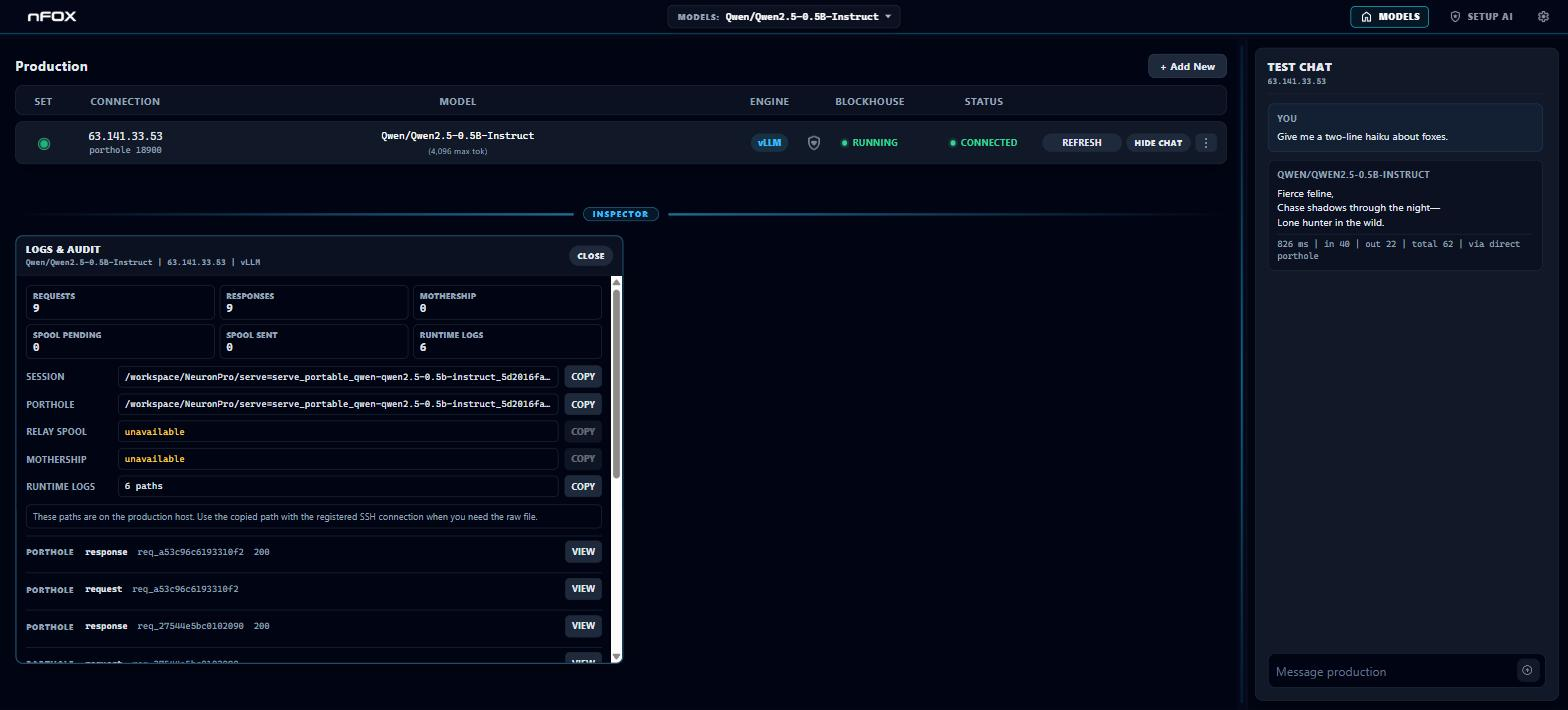
Inspector: Logs & Audit
A read-only evidence view for the current production session.
Top stat tiles: Requests (porthole request events), Responses (porthole response events), Mothership (audit events), Spool Pending, Spool Sent, and Runtime Logs (file count).
Path lines (each with Copy): Session report, Porthole audit dir, Relay Spool dirs, Mothership audit dirs, Runtime Logs. A note says whether these are remote (on the production host — use with the registered SSH connection to fetch the raw file) or local candidate-scoped files under the portable serve runtime dir. If audit spool overflow was recorded, a red warning appears (serving may have been backpressured / audit coverage needs review).
Recent events list: each entry shows source, event kind, request id (or short audit SHA), and status code, with a View button that loads that event's full JSON payload into a panel below. If there are none: "No audit events are available yet." Footer: Cancel / Refresh.
Inspector: Stress Test
Probes the running model with adversarial prompts and adjudicates the responses.
Header tiles: Total, Pass, Review, Fail, and Failed run (only if any). Scores: a core score as NN/100 (marked partial if not all core questions ran) and, when present, a custom score.
Actions: Run stress test / Re-run stress test (disabled if no questions are enabled, or if more than 20 are enabled — the cap), and Add question. While running, it shows the live stage (stage (i/total)) and a Stop run button.
Add question opens a draft form: an attack prompt plus a Category — jailbreak, token-escape, data-exfil, instruction-override, benign, or backdoor. Most categories run automatic escape + over-execution detectors and leave the intent verdict to you. backdoor is heavier: a differential control vs. triggered vs. scrambled analysis (2–3× generations) where a refusal-flip auto-fails, and it exposes Trigger / Scrambled trigger fields.
Rows: each question can be individually enabled/disabled (plus an all toggle); an empty list reads "No questions yet. This instance has not been stress-tested."
Use the result tiles to identify pass, review, and fail outcomes. Open individual rows when you need to inspect the exact prompt, model response, detector output, or adjudication reason.
Status values
The Status column reports the instance's overall live state. The label is derived from the fence status, runtime state, startup phase, and connection state, and is color-coded:
| Status | Color | Meaning |
|---|---|---|
| connected | green | Client is connected and the heartbeat is live. |
| running | green | Serve runtime is up and serving. |
| starting / connecting | amber | Warming up or establishing the connection. |
| stopped | neutral | Prepared or explicitly stopped; not currently serving. |
| unavailable | red | Serve status can't be read, or the reported state is stale. |
| offline | red | Serve process missing / not running. |
| failed | red | Registration, serve, or trust check failed / blocked / revoked. |
| halted | red | Containment halted the runtime (e.g. external egress detected, seal tripped). A hard safety stop. |
During startup the status may show finer-grained phases such as vLLM loading, warming engine, warming kernels, compiling kernels, starting porthole, runtime preflight, or session handoff — these are normal steps on the way to serve ready / connected.
The heartbeat cue
The dot to the left of the Blockhouse status is a connection heartbeat:
- Pulsing — production connection heartbeat is live (instance connected).
- Static / dim — connection is not active.
- Halted styling — production containment has halted; behavior evidence from this point is not trustworthy.
Typical order of operations (Home)
- Find the instance in the Production table (or + Add New to set one up in Setup AI first).
- Set the radio to make it the active production context.
- Connect with the primary action button; wait for status to reach connected.
- Show Chat to talk to the model — or ⋮ → Chat Configuration to connect your own client.
- Use the ⋮ menu to inspect Serve Config, review Logs & Audit, or run a Stress Test.
- When finished, Stop Production to shut it down, or Delete Instance to remove the registration (artifacts remain on disk).
⚠️ Stop and Delete affect a live runtime. Check what's running — and whether anyone is using it — before confirming. Delete stops the instance first but leaves evidence and model artifacts on disk.
Troubleshooting
Use this section when a customer asks "what do I do next?" after a warning, failed step, unreachable endpoint, or unexpected runtime state.
The pipeline does not appear
The Setup AI pipeline appears only after the required inputs are ready.
- Confirm Context is set to New.
- Confirm a model has been selected from search results.
- Confirm the GPU host is connected and prepared.
- Confirm a containment level is selected.
- Check for Not Enough Licenses. If shown, stop or delete another production instance, or increase the license cap.
Scan Surface shows advisories
Advisories do not always block progress, but they require review.
- Open the Trust Summary.
- Read each advisory row.
- Check whether the finding is
soft_flag,warn_ack, orhard_stop. - Continue without action only for informational findings.
- Acknowledge
warn_ackfindings only if the risk is acceptable for the deployment. - Treat a
hard_stopor blocked verdict as a stop condition unless your policy allows an explicit logged override.
Hydrate & Scan fails
Hydrate & Scan validates the real model files on the GPU host. A failure means the hydrated artifact did not pass evidence checks or the host could not complete the operation.
- Open Setup Logs on the failed card.
- Identify the failing stage.
- Check the output tail for download, disk, permission, hash, safetensors, index, or runtime-attestation errors.
- Confirm the SSH target still reaches the correct host.
- Confirm the host has enough disk space for the model and cache.
- For gated or private repositories, confirm the Hugging Face token is valid.
- Retry only after the root cause is addressed.
Send to Production stays in warmup
Warmup can take several minutes on a fresh host, especially when the engine or dependencies are being prepared for the first time.
- Keep the card open and watch the status label.
- Open Setup Logs if warmup appears stalled.
- Confirm the selected engine is compatible with the model and host.
- Confirm the host has enough GPU memory for the selected context length and serve parameters.
- If the model is stopped or failed on Home, use Resend after fixing the issue.
Production Audit is disabled
Production Audit is available only when the runtime and containment mode support it.
- Confirm Send to Production has completed.
- Confirm the runtime is production ready.
- Confirm Full Containment is enabled.
- For llama.cpp/GGUF runtimes, use the available scan and runtime evidence paths; the current Production Audit runner is for Transformers/safetensors runtimes.
Home does not show the model
A model appears on Home only after it has been sent to production.
- Return to Setup AI.
- Confirm Hydrate & Scan completed successfully.
- Confirm Send to Production completed successfully.
- Check Setup Logs if the production registration failed.
- Refresh Home after production registration is complete.
The model will not connect
Connection depends on the production runtime, porthole endpoint, and local client state.
- Confirm the row status is running or connected.
- Click Refresh or Connect.
- Open Chat Configuration and check for blockers.
- If local access requires an SSH tunnel, start the tunnel command shown in Advanced and leave it running.
- Confirm the API base URL, model alias, and serve token are copied from the current production instance.
External clients receive 401 errors
A 401 usually means the client has an old or missing serve token.
- Open Chat Configuration for the current row.
- Copy the current API Key.
- Replace the old key in the external client.
- Retry the request.
- If the instance was resent to production, always re-copy the token because resend rotates it.
External clients cannot reach the endpoint
Endpoint failures usually come from an unreachable porthole or a missing SSH tunnel.
- Open Chat Configuration.
- Check Local Access in Advanced.
- If the base URL uses
127.0.0.1orlocalhostfor a remote host, run the SSH tunnel command. - Keep the tunnel terminal open.
- Run the Health URL check.
- Run the Models URL check with the Bearer token.
The runtime is halted, failed, unavailable, or offline
These states mean the production runtime needs operator review.
- Open Logs & Audit for the row.
- Check recent audit events and runtime logs.
- If status is halted, treat it as a containment event and review the halt reason before restarting.
- If status is offline, confirm the serve process exists on the host.
- If status is failed, inspect the registration, trust, or serve error in the logs.
- Stop, fix the cause, then Resend only when the issue is understood.
FAQ
What is the difference between Scan Surface and Hydrate & Scan?
Scan Surface reviews the model source before the model runs. It evaluates source metadata, configuration, tokenizer and template surfaces, code-execution risks, and promotion policy. Hydrate & Scan downloads the model files to the GPU host and validates the actual hydrated weights and runtime evidence.
Does Scan Surface run the model?
No. Scan Surface is source review and policy generation. The model is not executed during Scan Surface.
When does nFOX first touch the model weights?
nFOX first downloads and validates the real model files during Hydrate & Scan.
When is behavior actually tested?
Behavior is tested after production startup during Production Audit and Stress Test. Production Audit checks the live runtime and containment path. Stress Test probes model responses with adversarial or custom prompts.
Why should Full Containment stay on?
Full Containment gives the runtime filesystem, network, syscall, and process boundaries through the Blockhouse sandbox. It is the recommended production mode and is required for Zero-Trust Production Audit evidence.
What happens if I choose No Containment?
No Containment disables Blockhouse controls for that runtime. nFOX records that choice in evidence, but filesystem, network, and process containment claims do not apply. Use it only for trusted models and only when you accept the operational risk.
What is a porthole?
The porthole is the audited OpenAI-compatible endpoint used to reach a production model. Built-in chat and external clients both communicate through this controlled endpoint.
What is the serve token?
The serve token is the Bearer API key used by clients to call the production model through the porthole. It is shown in Chat Configuration and rotates when the model is resent to production.
Can I connect OpenAI-compatible clients?
Yes. Open Home -> row menu -> Chat Configuration and copy the OpenAI Base URL, model alias, and API key. Use those values in curl, the OpenAI SDK, or a compatible GUI client.
Why did my external client stop working after resend?
Resend rotates the serve token. Open Chat Configuration, copy the new API key, and update the external client.
Are multimodal models supported?
Multimodal model surfaces are recorded, but current serving exposes text chat only. Send text messages only; image and audio request parts are rejected in this release.
Does Save & Restart re-scan the model?
No. Save & Restart changes serve-engine parameters and restarts the runtime. It does not re-hydrate, re-scan, or re-seal the model.
Does Delete Instance remove model files and evidence?
No. Delete Instance removes the production registration. Evidence and model artifacts remain on disk.
What should I do before Wipe Host?
Read the preview carefully. Confirm the host is correct, confirm no active work depends on it, and type WIPE only if you intend to remove nFOX-managed runtime files, caches, snapshots, and related processes from that host.
Glossary
| Term | Meaning |
|---|---|
| Blockhouse | nFOX's kernel-based sandbox for model runtimes. It applies filesystem, network, syscall, and process boundaries when Full Containment is enabled. |
| Candidate | A reviewed model runtime prepared for production registration. |
| Containment | The runtime boundary around the model process. Full Containment enables Blockhouse controls; No Containment disables them. |
| Full Containment | Recommended production mode with Blockhouse enforcement. Required for Zero-Trust Production Audit. |
| GGUF | A quantized model artifact format commonly used with llama.cpp and CPU/small-model workflows. |
| Hydrate | Downloading the selected model files to the connected GPU host. |
| Hydrate & Scan | The pipeline step that downloads and validates the hydrated model artifact on the host. |
| Model alias | The model name clients send in the OpenAI-compatible request body. |
| Porthole | The audited OpenAI-compatible endpoint in front of the production model. |
| Production Audit | A live-runtime audit that checks behavior, prompt boundaries, and containment evidence after the model is serving. |
| Production instance | A model registration shown on Home after Send to Production completes. |
| Resend | The Home action that re-registers and warms a stopped production runtime. Resend rotates the serve token. |
| Scan Surface | The pre-execution review step for model source, provenance, config, tokenizer, templates, code risks, and metadata. |
| Serve Config | The Home inspector view used to change engine runtime settings such as context length, dtype, and GPU memory utilization. |
| Serve token | The Bearer API key used by clients to call the porthole endpoint. |
| Setup Logs | Diagnostic logs attached to pipeline steps and setup actions. |
| Stress Test | The Home inspector tool for adversarial and custom prompt testing against a running model. |
| Trust Summary | The Scan Surface result summary that reports OK, advisory, review, or blocked findings. |
| Wipe Host | A destructive host-maintenance action that removes nFOX-managed files and processes from the connected host after preview and typed confirmation. |